In This Guide
What Is a Lined Script?
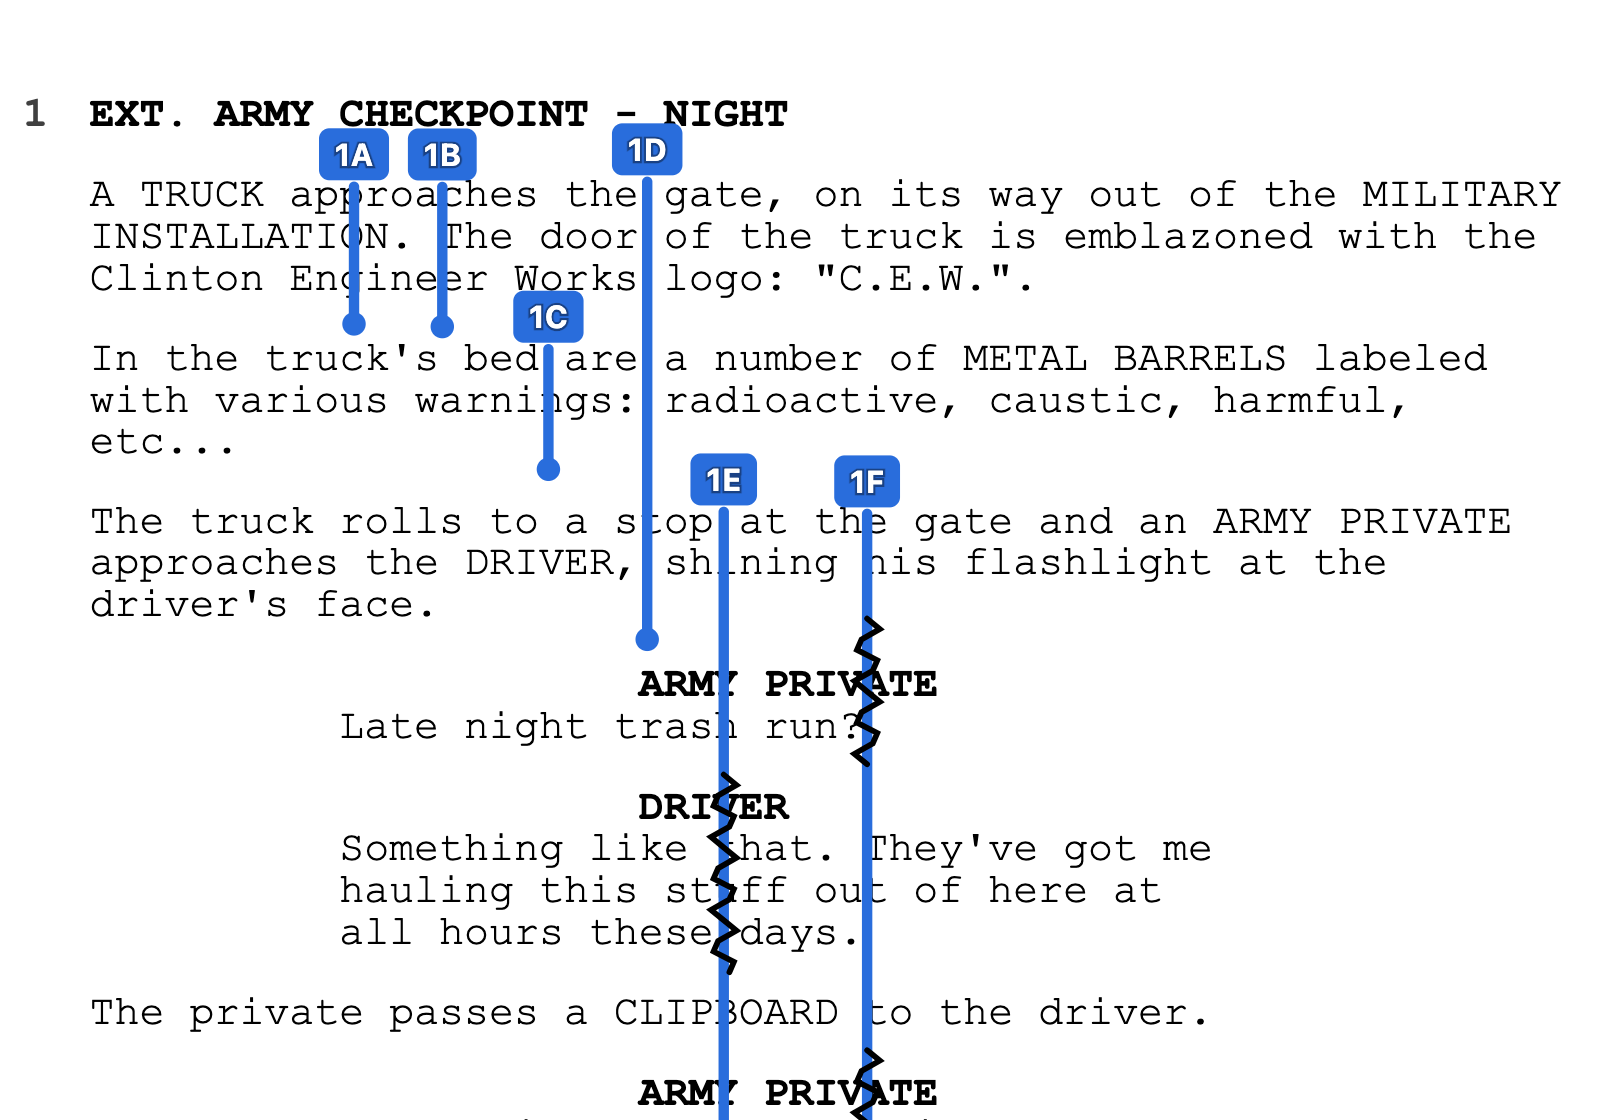
A lined script is a copy of the screenplay with vertical lines drawn through the text to indicate which portions of dialogue, action, and description will be captured by each camera setup. Each line represents a single shot or setup — a continuous run of the camera covering a specific portion of the scene.
The lines run vertically down the page, spanning the text that will be on screen during that shot. If a wide shot covers an entire scene, the line runs from the first line of action to the last. If a close-up only captures one character's dialogue in the middle of the scene, the line covers just those lines of text.
When a scene is fully lined, you can look at the page and immediately see how many setups are planned, which text is covered by each shot, and whether any dialogue or action is missing coverage. It's a visual map of your shooting plan laid directly on top of the screenplay.
Why Line a Script?
Lining the script does a few things at once. First, it forces the director to think through coverage before arriving on set. Every scene needs a plan for how it will be captured — which moments get close-ups, where the wide shot lives, how dialogue is covered between two or more characters. Lining the script is where that plan gets made concrete.
Second, it exposes gaps. If you line a scene and realize that a critical piece of action isn't covered by any shot, you catch that in prep rather than in the edit bay. Similarly, if a scene has twelve setups for two pages of dialogue, the lined script makes it obvious that you've overplanned and may not have time to shoot everything.
Third, the lined script becomes the source document for the shot list. Each line drawn on the page corresponds to a shot that needs to be set up, blocked, lit, and filmed. The shot list is essentially the lined script translated into a table format — and in a connected tool, that translation can happen automatically.
Who Lines the Script?
In pre-production, the director typically lines the script — or works with the 1st AD to plan coverage. This is the planning version: deciding in advance how each scene will be shot.
During production, the script supervisor maintains the lined script on set, marking which setups were actually shot and which portions of the scene were captured in each take. This is the record-keeping version — a running log of what the camera actually covered, which is critical for the editor.
On indie and student productions, these roles often collapse into one. The director plans coverage in pre-production and tracks it during the shoot, or a single crew member handles both sides. Either way, the lined script is the artifact that connects the two phases.
Types of Lines
Not all lines on a lined script look the same. The visual style of each line communicates information about the shot it represents.
Straight Lines
A straight vertical line is the default. It indicates a standard shot where the covered text is on screen — the actors speaking the dialogue or performing the action are visible in the frame.
Squiggly Lines (Wavy Lines)
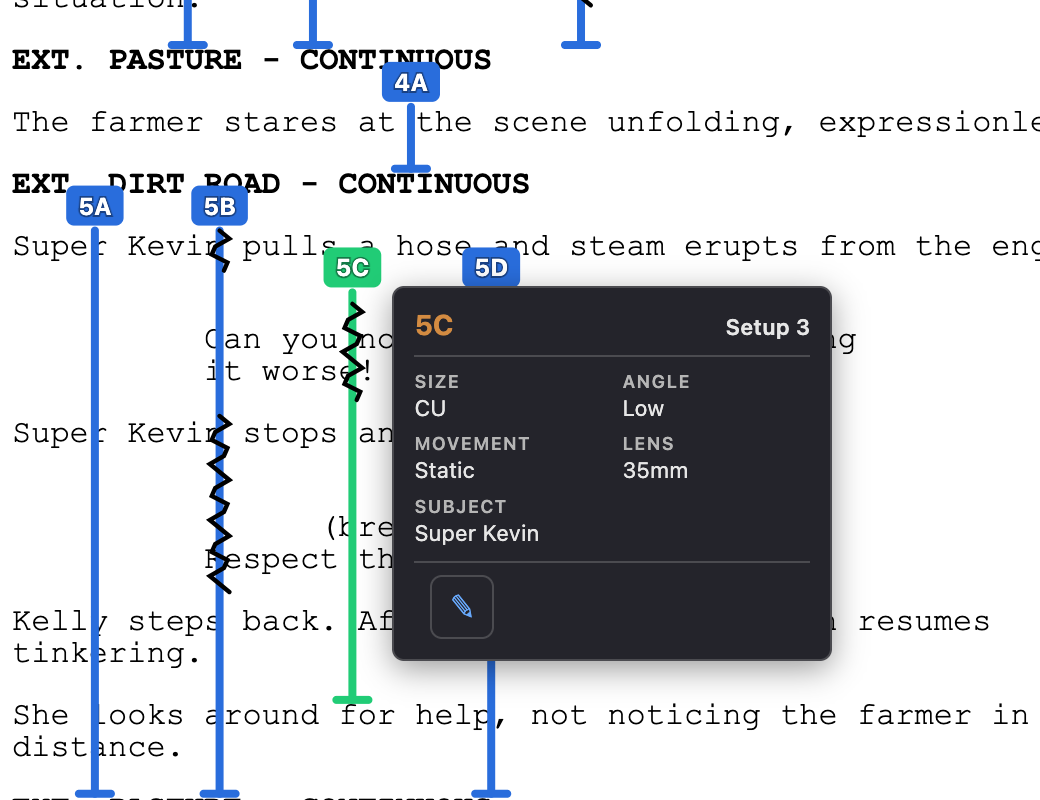
A squiggly or wavy line indicates that the covered text is off screen during that shot. The most common use is off-screen dialogue — a character is speaking, but the camera is on another character's reaction. The squiggle tells you the dialogue is happening during this shot, but the speaker isn't in frame.
Line Placement and Width
Lines are placed side by side across the width of the page. The first setup in a scene gets the leftmost line, and subsequent setups are drawn to the right. When a page has many lines packed together, it tells you at a glance that the scene has extensive coverage. A page with just one or two lines signals a simpler shooting plan.
Squiggles and Off-Screen Dialogue
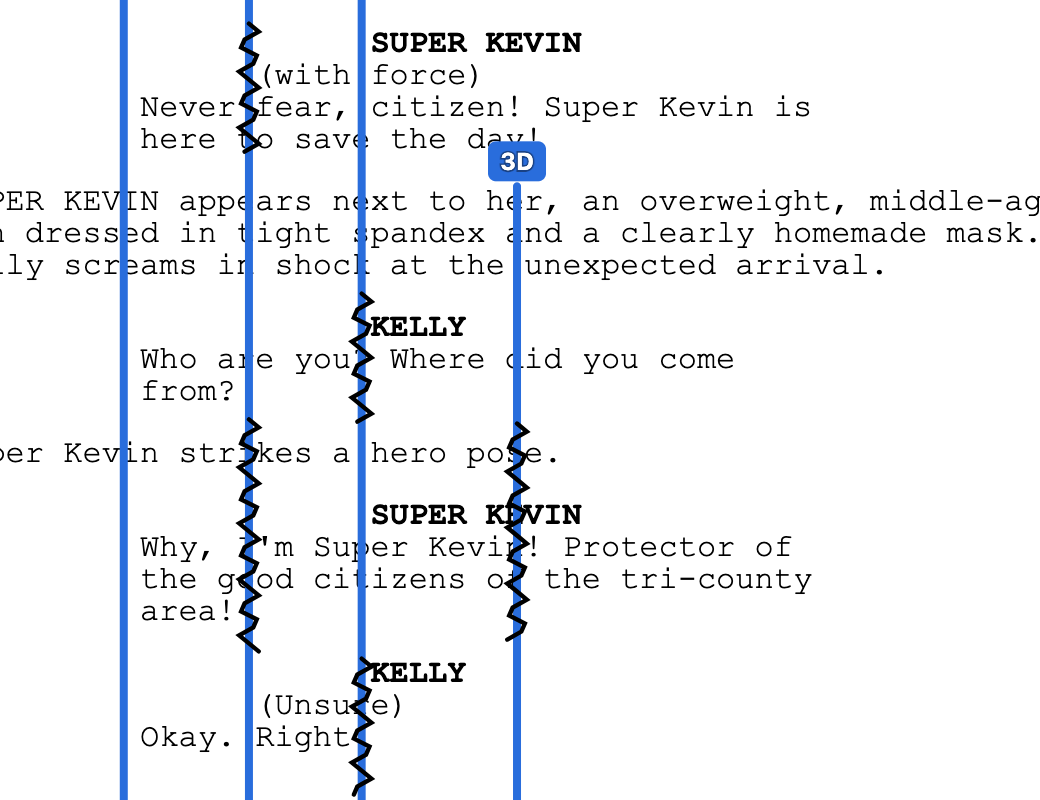
Squiggles deserve their own section because they're where most beginners get confused. The key concept is simple: a straight line means the text is on screen, and a squiggle means the text is happening but the subject isn't in frame.
Imagine a two-person dialogue scene. Character A and Character B are talking. You plan three setups: a wide shot of both characters, a close-up of A, and a close-up of B.
The wide shot's line runs straight through the entire scene — both characters are on screen for all of it. The close-up of A runs straight through A's dialogue but has squiggles through B's dialogue — because during B's lines, the camera is still on A (capturing their reaction), but B is off screen. The close-up of B is the mirror: straight through B's lines, squiggles through A's.
This pattern — straight for on-screen, squiggle for off-screen — is consistent regardless of how complex the scene gets. Even in a scene with six characters and ten setups, every line follows the same rule.
How to Line a Script, Step by Step
Whether you're working on paper or digitally, the process follows the same logical steps.
1. Read the Scene
Before drawing anything, read the scene through and think about how you want to cover it. How many setups do you need? Where does the scene's emotional weight live? Is there a moment that demands a close-up, or does the scene play better in a wider frame? You don't need to finalize every decision — but you should have a rough plan before you start drawing lines.
2. Start with the Master Shot
Most scenes begin with a master shot — a wide or medium-wide setup that covers the entire scene from beginning to end. Draw your first line from the top of the scene to the bottom, straight through all the text. This is your safety coverage — the shot that captures everything, even if individual close-ups don't work out.
3. Add Coverage Setups
Now add the tighter shots. If you're planning a close-up of a character during a specific exchange, draw a line that spans just that portion of the scene. Use straight lines through the text where the subject is on screen and squiggles where they're off screen but the shot is still rolling.
4. Check for Gaps
Look at the page. Is every line of dialogue covered by at least one straight line? Is every piece of critical action visible in at least one setup? If you see text that has no line running through it at all, that's a coverage gap — you'll need to add a setup or extend an existing one.
5. Label Each Line
Each line should be identifiable — typically with a shot number, description, or both. On paper, this might be a number written at the top of the line. In a digital tool, each line connects to a shot list entry with fields for framing, lens, movement, and notes.
Tip: Don't over-cover. It's tempting to plan a setup for every moment, but on an indie production, every setup costs time. If you can cover a scene in four setups instead of eight, you'll have more time to get each one right — and your actors will have more energy for the takes that matter.
Traditional vs. Digital Lining
The traditional method is physical: you print the screenplay, grab a ruler and colored pencils, and draw lines directly on the paper. Each colored pencil represents a different shot. This approach is tactile and immediate — you can see the whole scene at once, and there's something satisfying about the physical markup. The downsides are that it's difficult to revise (erasing and redrawing lines is messy), it doesn't connect to anything else (your shot list is a separate document you maintain by hand), and it doesn't travel well.
Digital lining solves these problems. In a tool like Lína, you draw lines directly on a rendered screenplay page, and each line automatically creates a shot list entry and a storyboard frame. You can move and resize lines freely, add squiggles, and edit shot details without starting over. When the screenplay changes — a page gets added, dialogue gets rewritten — the lines reconcile to the new layout automatically.
The tradeoff is that digital tools require a screen, and some people simply prefer the feeling of working on paper. Both methods produce the same artifact — a lined script that maps coverage onto the page. Choose whichever approach fits your workflow.
From Lined Script to Shot List
The lined script and the shot list are two views of the same information. The lined script shows coverage spatially — lines drawn on the page — while the shot list presents it as a structured list with fields for each shot's details.
On a traditional production, translating from one to the other is manual: you look at each line on the lined script and write a corresponding entry on the shot list. On larger productions, this is the 1st AD's job. On indie sets, it's whoever has the clipboard.
In a connected tool, this translation is automatic. Each line drawn on the script creates a shot list entry. The entry inherits the scene number and text range from the line, and you fill in the details — shot type, framing, lens, camera movement, equipment notes. If you move a line on the script, the shot list updates. If you delete a line, the shot disappears from the list. The two views stay in sync because they're the same underlying data.
This is where lining a script pays off most clearly: the shot list isn't a separate document you have to build and maintain — it emerges directly from the coverage plan you drew on the script.